Healthy Cheesecake with Greek Yogurt
Healthy Cheesecake with Greek Yogurt: A Guilt-Free Indulgence
Ever wondered if you could enjoy the creamy decadence of cheesecake without the accompanying guilt? What if I told you that you could savor each bite of a delicious healthy cheesecake while still staying on track with your nutrition goals?
This Healthy Cheesecake with Greek Yogurt recipe transforms the traditionally calorie-laden dessert into a protein-packed treat that’s lower in fat and sugar but doesn’t compromise on flavor. By swapping full-fat cream cheese with Greek yogurt and incorporating natural sweeteners, we’ve created a dessert that satisfies your sweet tooth while nourishing your body.
Whether you’re health-conscious, watching your weight, or simply looking to incorporate more nutritious options into your diet, this recipe proves that healthy eating doesn’t mean giving up the foods you love. Let’s dive into this game-changing dessert that’s about to become your new favorite!
Ingredients List
For the crust:
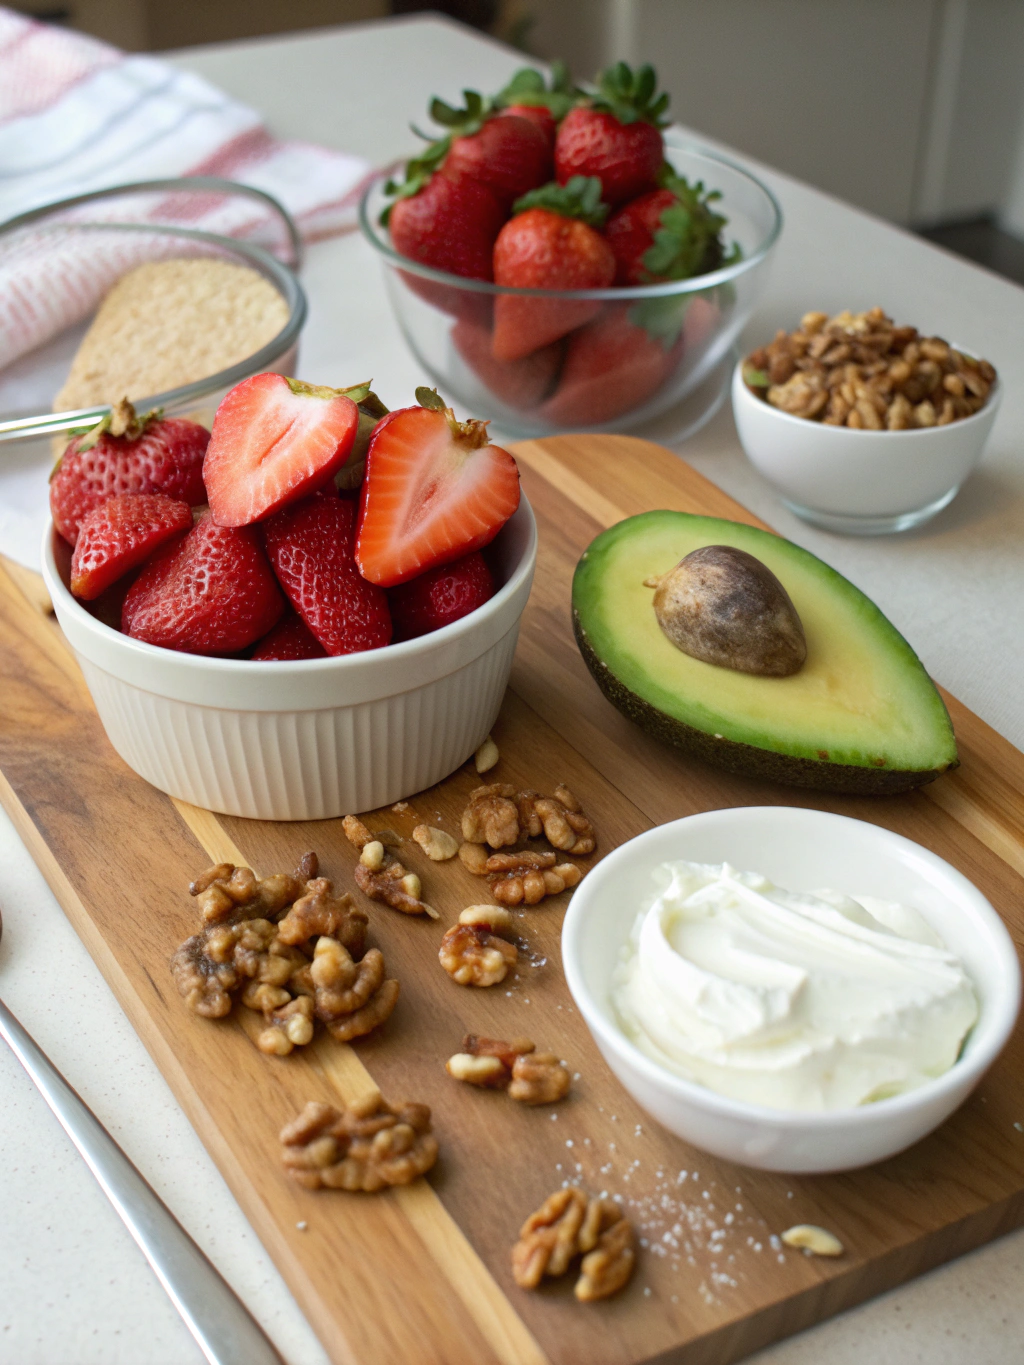
- 1½ cups almond flour (or graham cracker crumbs for a traditional option)
- 3 tablespoons melted coconut oil
- 2 tablespoons maple syrup or honey
- 1 teaspoon vanilla extract
- ¼ teaspoon salt
For the filling:
- 2 cups plain Greek yogurt (2% or full-fat works best for creaminess)
- 8 oz reduced-fat cream cheese, softened
- ⅓ cup honey or maple syrup (adjust to taste)
- 3 large eggs, room temperature
- 2 tablespoons cornstarch or arrowroot powder
- 1 tablespoon lemon juice
- 2 teaspoons vanilla extract
- Zest of one lemon (optional, for enhanced flavor)
For the topping (optional):
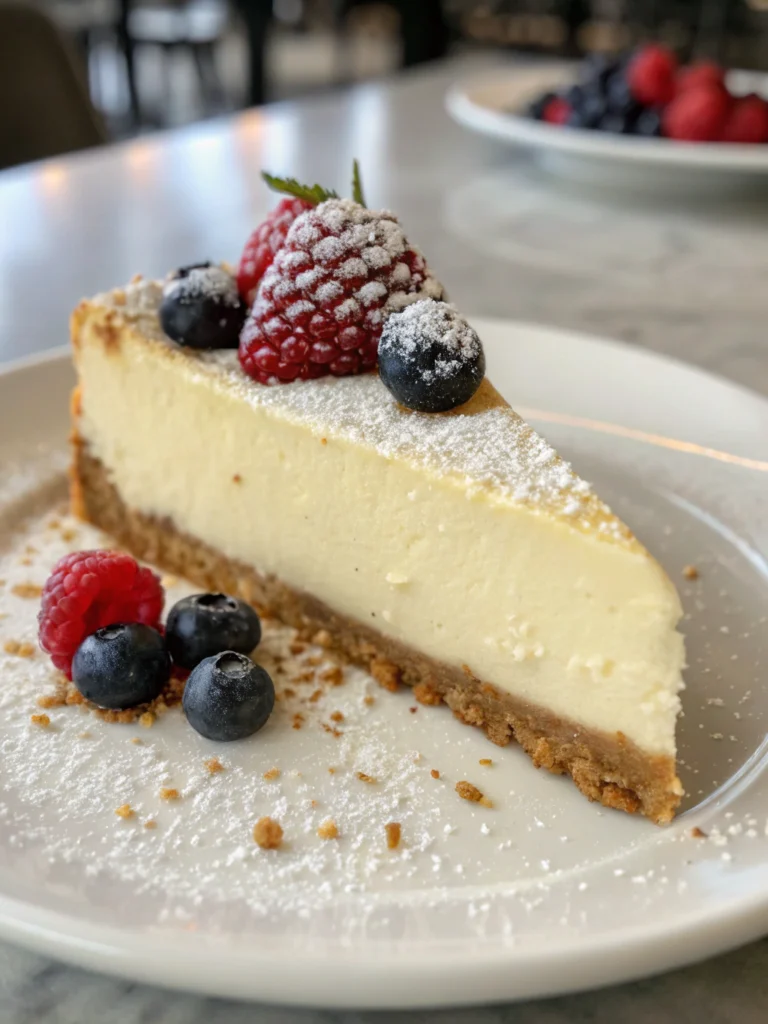
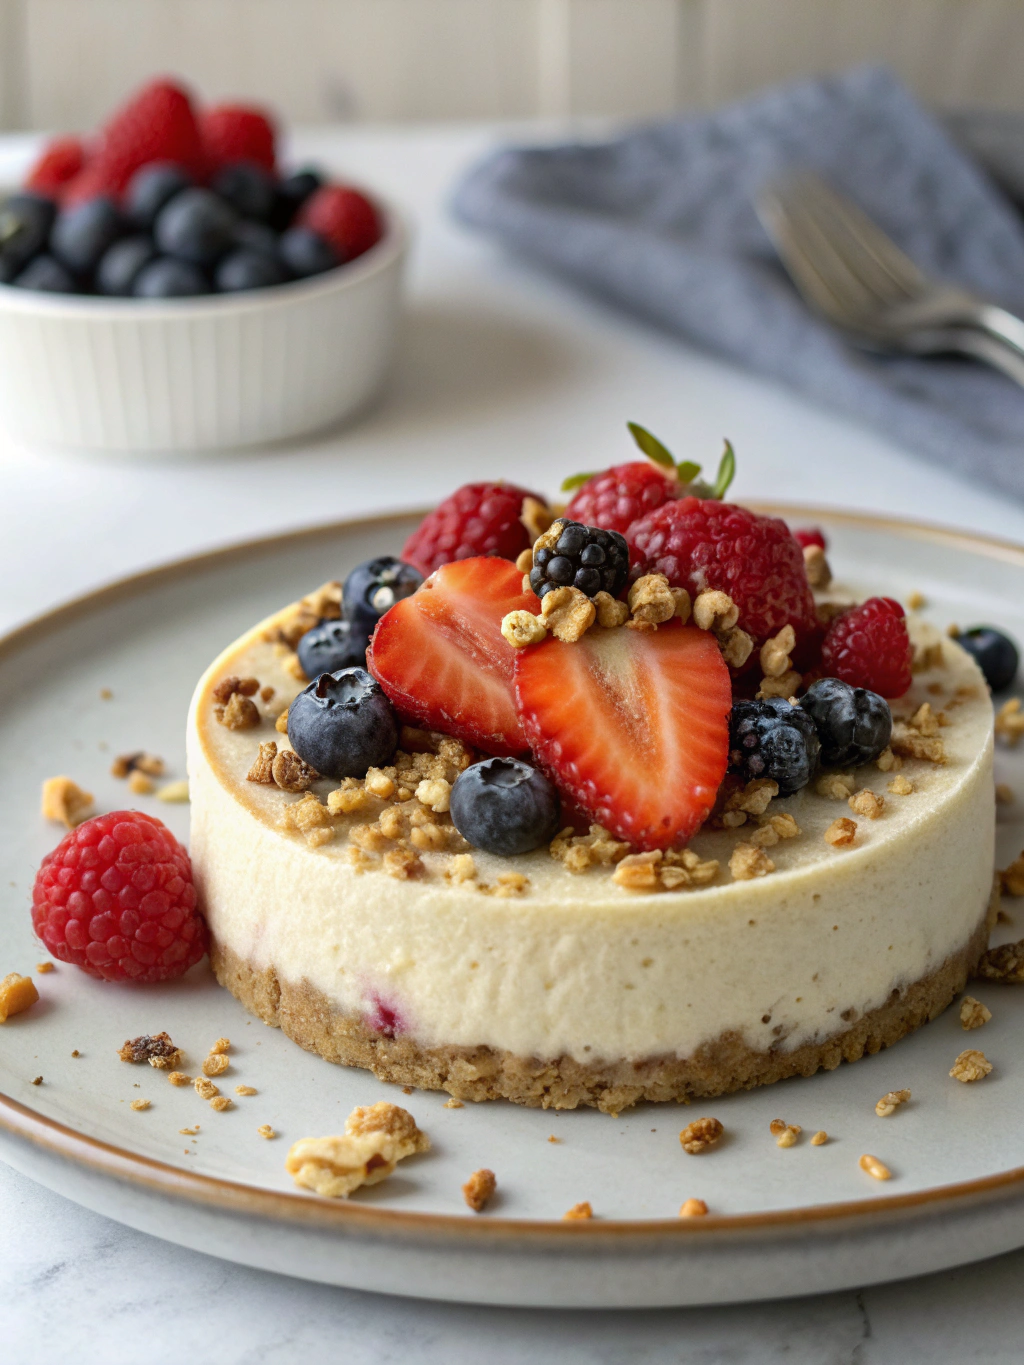
- 2 cups mixed fresh berries (strawberries, blueberries, raspberries)
- 1 tablespoon honey
- 1 teaspoon lemon juice
Timing
Preparation time: 25 minutes
Baking time: 45-50 minutes
Cooling time: 4 hours (minimum)
Total time: Approximately 5 hours and 15 minutes
While this healthy cheesecake requires patience for cooling, the active preparation time is 30% less than traditional recipes. The wait is absolutely worth it for a dessert that’s both satisfying and nutritious!
Step-by-Step Instructions
Step 1: Prepare Your Workspace
Preheat your oven to 325°F (165°C). Lightly grease a 9-inch springform pan with cooking spray or coconut oil. Wrap the outside of the pan with aluminum foil to prevent water from seeping in during baking. This water bath method ensures even cooking and prevents cracks.
Step 2: Create the Crust
In a medium bowl, combine almond flour, melted coconut oil, maple syrup, vanilla extract, and salt. Mix until the ingredients are well incorporated and resemble wet sand. Press the mixture firmly into the bottom of your prepared springform pan, creating an even layer. Use the bottom of a measuring cup to compact the crust.
Step 3: Pre-bake the Crust
Bake the crust for 10 minutes until it’s lightly golden. Remove from the oven and allow it to cool slightly while preparing the filling. This pre-baking step ensures your crust remains crisp even after adding the wet filling.
Step 4: Prepare the Filling
In a large mixing bowl, beat the softened cream cheese until smooth and fluffy, about 2 minutes. Add the Greek yogurt and blend until completely incorporated. Next, add honey or maple syrup and mix well. The natural sweeteners provide a more complex flavor profile than refined sugar while offering nutritional benefits.
Step 5: Complete the Filling Mixture
Add eggs one at a time, mixing well after each addition but avoiding overmixing. Gently fold in cornstarch, lemon juice, vanilla extract, and lemon zest if using. The cornstarch helps stabilize the yogurt and prevents it from becoming too watery, while the lemon brightens the flavor profile.
Step 6: Assemble and Prepare for Baking
Pour the filling over the pre-baked crust. Tap the pan gently on the counter a few times to remove air bubbles. Place the foil-wrapped springform pan in a larger roasting pan. Pour hot water into the roasting pan until it reaches about 1 inch up the sides of the springform pan, creating a water bath.
Step 7: Bake to Perfection
Carefully place the water bath setup in the oven and bake for 45-50 minutes. The cheesecake is done when the edges are set but the center still has a slight jiggle. Avoid opening the oven door during baking as temperature fluctuations can cause cracks.
Step 8: Cool Gradually
When baking is complete, turn off the oven, crack the door open slightly, and let the cheesecake cool in the oven for about an hour. This gradual cooling prevents the dramatic temperature change that can cause the cheesecake to crack or sink in the middle.
Step 9: Chill Thoroughly
After cooling in the oven, remove the cheesecake and run a knife around the edges to loosen it from the pan. Refrigerate for at least 4 hours or preferably overnight. Patience is key here—proper chilling allows the flavors to meld and the texture to set perfectly.
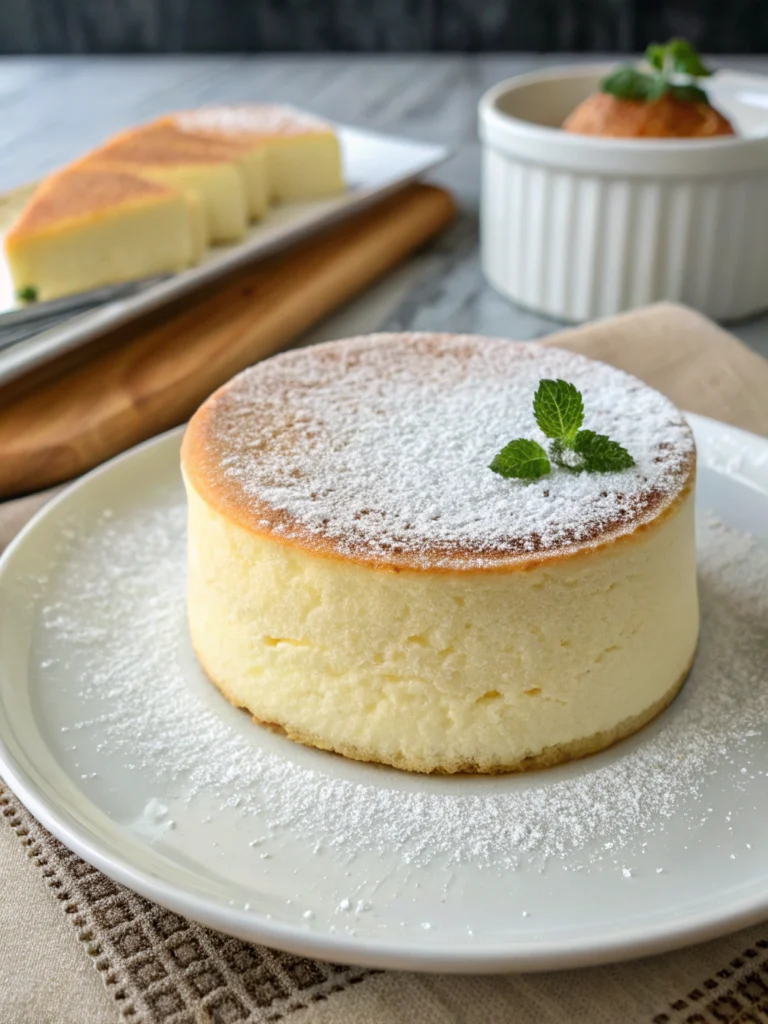
Step 10: Prepare Topping and Serve
Before serving, prepare the optional berry topping by combining fresh berries with honey and lemon juice in a small bowl. Let sit for 10 minutes to create a natural syrup. Remove the cheesecake from the springform pan, top with the berry mixture, and serve chilled.
Nutritional Information
Per serving (1/12 of cheesecake, without topping):
- Calories: 215 (compared to 450+ in traditional cheesecake)
- Protein: 10g (twice the amount in regular cheesecake)
- Fat: 14g (40% less than traditional recipes)
- Carbohydrates: 15g
- Fiber: 2g
- Sugar: 11g (60% less than conventional recipes)
- Calcium: 8% of daily value
- Vitamin D: 6% of daily value
This healthy cheesecake contains significantly fewer calories and less sugar than traditional versions while providing more protein thanks to the Greek yogurt. The almond flour crust adds healthy fats and fiber, making this dessert more satiating and nutritionally balanced.
Healthier Alternatives for the Recipe
For an even lighter version, try these modifications:
- Dairy-free option: Substitute dairy-free cream cheese and coconut yogurt for a vegan-friendly version
- Sugar-free variation: Use monk fruit sweetener or stevia in place of honey or maple syrup
- Gluten-free crust: The almond flour crust is naturally gluten-free, but you can also try a crust made from crushed gluten-free cookies
- Lower-fat version: Use fat-free Greek yogurt and neufchâtel cheese (⅓ less fat than regular cream cheese)
- Higher protein boost: Add 1-2 scoops of unflavored or vanilla protein powder to the filling
For those with nut allergies, substitute the almond flour with oat flour or graham cracker crumbs. Each alternative maintains the integrity of this delicious dessert while accommodating various dietary needs.
Serving Suggestions
Elevate your healthy cheesecake experience with these creative serving ideas:
- Create a dessert bar with various toppings (fresh fruit, dark chocolate shavings, toasted nuts) for guests to customize their slices
- Serve with a dollop of whipped coconut cream for a dairy-free topping alternative
- Drizzle with a small amount of dark chocolate sauce for chocolate lovers
- Pair with a scoop of protein ice cream for an extra-special treat
- Cut into bite-sized squares and serve as part of a dessert platter for entertaining
- Add a sprinkle of cinnamon or cardamom for a warming spice note that complements the tangy yogurt
For brunch gatherings, serve smaller slices alongside fresh fruit and coffee for an impressive yet health-conscious offering that guests will appreciate.
Common Mistakes to Avoid
- Using cold ingredients: Always bring cream cheese and eggs to room temperature for a smooth, lump-free batter.
- Overmixing the filling: This incorporates too much air, leading to cracks and an uneven texture. Mix just until ingredients are combined.
- Skipping the water bath: The water bath provides gentle, even heat that prevents cracking and ensures creamy texture.
- Using regular yogurt instead of Greek: Regular yogurt contains too much moisture and will make your cheesecake runny. Always use strained Greek yogurt.
- Rushing the cooling process: Allowing the cheesecake to cool gradually prevents cracks and texture issues. Never rush this step!
- Using fat-free products exclusively: Some fat is necessary for proper texture. Use at least 2% Greek yogurt for best results.
Storing Tips for the Recipe
This healthy cheesecake keeps beautifully when stored properly. Refrigerate leftovers in an airtight container for up to 5 days. For best results, store the cheesecake and topping separately, adding fresh berries just before serving to prevent the cake from becoming soggy.
To freeze, wrap individual slices tightly in plastic wrap, then aluminum foil. Store in a freezer-safe container for up to 2 months. Thaw overnight in the refrigerator before serving. The texture may change slightly after freezing, but the flavor remains delicious.
For meal prep, you can prepare the crust and filling separately up to 2 days in advance. Store the unbaked crust (covered) at room temperature and the filling in the refrigerator until ready to assemble and bake.
Conclusion
This Greek yogurt cheesecake proves that healthy eating doesn’t mean sacrificing your favorite desserts. By making thoughtful ingredient swaps and following proper techniques, you can enjoy a creamy, satisfying cheesecake that supports your wellness goals while delighting your taste buds.
The protein-rich Greek yogurt, reduced sugar content, and nutrient-dense crust transform an indulgent classic into a balanced treat you can feel good about serving to family and friends. Plus, the versatility of this recipe means you can adapt it to suit almost any dietary preference or restriction.
Have you tried making this healthy cheesecake recipe? Share your experience in the comments below! Did you try any creative variations or toppings? I’d love to hear how you made this recipe your own. And if you’re looking for more nutritious dessert options, be sure to check out our collection of guilt-free treats that never compromise on flavor!